In the realm of fashion, a well-fitted vest can add a touch of sophistication to any ensemble. However, achieving that perfect fit begins with accurate measurements. When it comes to clothing, one size does not fit all.
Proper calculations ensure that your vest fits snugly and comfortably, highlighting your silhouette in the best possible way. Avoiding the pitfalls of an ill-fitting vest can elevate your overall look and boost your confidence. In this article, I am going to share the intricacies of measuring for a vest, guiding you through the process step by step.
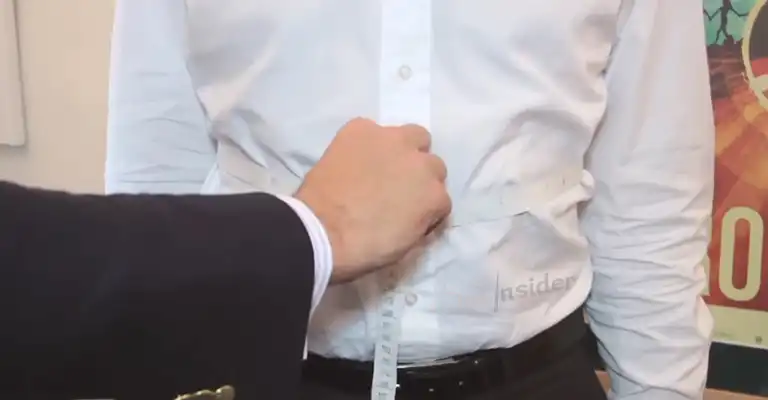
Tools Needed for Measurement
A. Measuring Tape
Investing in a soft, flexible measuring tape is essential for accurate measurements. The pliability of the tape ensures precision without distorting your body contours.
B. Mirror Assistance
Having a full-length mirror aids in maintaining proper posture during measurements, reducing the likelihood of errors.
Measurement Steps for Making a Vest for Men
.A. Chest Count
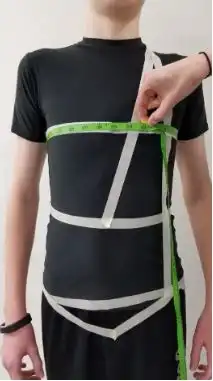
- The chest measurement is the cornerstone of vest sizing. Using a flexible measuring tape, wrap it around the fullest part of your chest, ensuring it remains parallel to the ground for accurate results.
- Wrap the measuring tape around the fullest part of your chest.
- Ensure the tape is snug but not tight.
- Record the measurement.
B. Waist Calculation
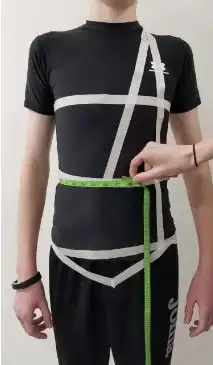
- Locate your natural waistline.
- Wrap the measuring tape around this point.
- Record the measurement. This ensures the vest complements your body shape without feeling too tight or loose.
C. Length Computing
Determining the ideal length involves measuring from the base of your neck to the desired endpoint, typically just below the beltline
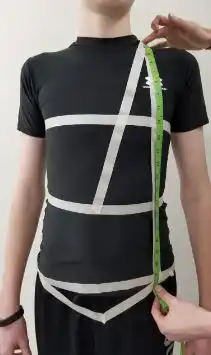
- Stand straight with your back against the mirror.
Meter from the base of your neck to the desired endpoint.
- Record the measurement.
D. Shoulder Measurement Process(front and back side)
The shoulder measurement ensures the vest sits well on your frame. Measure from the outer edge of one shoulder to the other, allowing for a comfortable fit.
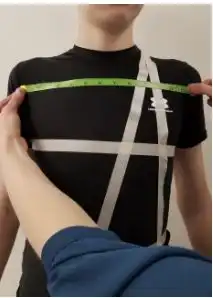
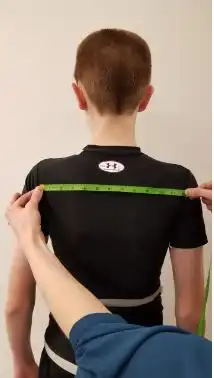
- Measure from the outer edge of one shoulder to the other.
- Keep the tape flat and parallel to the ground.
- Record the measurement.
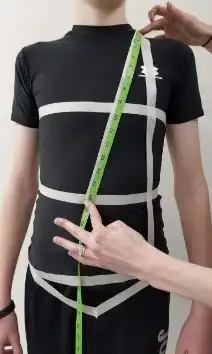
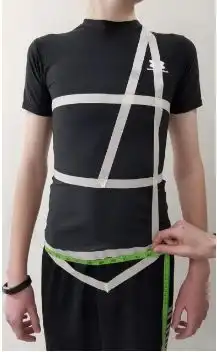
E. Top Shoulder to Waist
Measure from the top of your shoulder down to your waistline, keeping in mind that the waist always falls above the dancer’s belly button. This ensures precise measurements for a well-fitted vest that complements the body’s proportions.
F. Waist to Hip
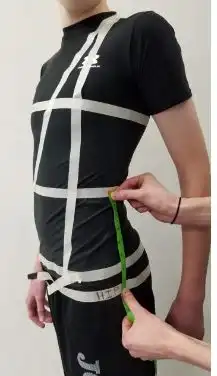
Measure from the waist down to the fullest part of the hips. It’s important to note that the hip measurement typically falls between 1-3 inches below the drop waist measurement. This ensures the accurate size for a vest that not only fits well around the torso but also accommodates the natural curves of the hips.
G. Drop Waist
Determining the drop waist is crucial for vest fitting. It typically falls about 1-3 inches above the hip line. To mark this point, use a piece of tape, and then use a measuring tape to encircle the drop waist location. This step ensures accurate measurements and helps achieve the desired length for a well-fitted and stylish vest.
Common Mistakes to Avoid
A. Incorrect Measurement Techniques
Avoid inaccuracies by following the prescribed measurement methods diligently.
B. Ignoring Posture
Maintain good posture during measurements to prevent distortions in your natural body shape.
C. Overlooking Personal Preferences
Consider your style and comfort preferences when deciding on sizes.
Considering Style and Fit
Balance your measurements with the desired style and fit of the vest. Some prefer a snug fit, while others prefer a looser style.
How often should I measure for a vest?
To maintain a well-fitted vest, measure every six months, accounting for weight fluctuations and seasonal changes. Regular measurements ensure comfort, functionality, and a polished appearance. Stay proactive in adapting your vest to lifestyle changes and prioritize both initial fittings and periodic checkups for consistent style and comfort.
Can I use a regular tape measure?
Yes, you can use a regular tape measure to measure for a vest. It’s a simple and effective tool for taking chest, shoulder width, and torso length measurements. Ensure the tape is snug but not tight for accurate results. This DIY approach is convenient for regular checkups and adjustments, contributing to a well-fitted and comfortable vest.
What if my measurements fall between sizes?
If your measurements fall between sizes, opt for the larger size. It’s easier to adjust a slightly larger vest through tailoring than trying to make a smaller one fit comfortably. Professional tailors can make precise alterations for an optimal fit, ensuring your vest is both stylish and comfortable. Don’t compromise on comfort—choose the larger size and customize as needed.
Is it better to size up or down for vests?
It’s generally better to size up for vests. A slightly larger size provides flexibility for adjustments, ensuring comfort and ease of movement. Tailoring can fine-tune the fit, whereas sizing down may lead to a tight and uncomfortable vest. Prioritize a comfortable baseline, allowing for personalized alterations to achieve the perfect fit without compromising style or functionality.
Can I measure myself accurately?
Yes, you can measure yourself accurately using a flexible tape measure for chest, shoulder width, and torso length. While a mirror is useful for assessing how the vest fits after putting it on, it may not directly aid in the measurement process. Ensure the tape is snug but not tight for precise measurements. A friend’s assistance can enhance accuracy, especially for shoulder width, contributing to a well-fitted vest that looks great.
Conclusion
Accurate measurements are paramount for a well-fitted vest, ensuring comfort and a polished appearance. By following the step-by-step guide and using essential tools like a measuring tape and a mirror, you can avoid common mistakes and achieve the perfect fit. Remember, posture matters and personal preferences play a role in determining the ideal measurements. A snug, tailored vest not only boosts confidence but also enhances your overall style, creating a sophisticated and put-together look.
Leave a Reply